SSH Tunneling
An SSH tunnel is usually an ssh session from a local port to a remote server port. Once established, you can communicate to that server via your localhost/port numbers instead of direct communication. This is very usefull for creating secure services out of normally insecure ones.
To tunnel in SSH, you use the -L option as follows:
ssh -L LocalPort:RemoteHost:RemotePort [user@]host
To test this, we will tunnel the servers SMTP port 25. First start the tunnel:
ssh -L 1234:server.acme:25 server.acme
Once you are logged into server.acme, open another local xterm and use telnet like this:
telnet  localhost  1234
Connected to localhost.
Escape character is '^]'.
220 server.acme ESMTP Postfix (Postfix-20010228-pl02)
The fact that you get to the mail server on server.acme indicates that you have sucessfully tunneled via SSH. Exit from this telnet session by hitting verb|’^]’| and then hit ‘q’ once inside the telnet command mode.
One common application for ssh tunneling is to use it to secure POP mail. Normally POP works over unsecure connections and allows hackers to see all of your mail and even your password. The tunnel you need for this application looks like this:
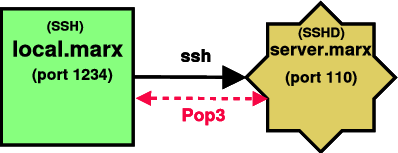
SSH Tunneling Pop3
The command needed for this is:
ssh -L 1234:server.acme:110 -N server.acme
In the other terminal you can start your usual pop client which is pointed to localhost:1234. If you dont use Firefox or Thunderbird you can use the fetchmail program’s preconnect directive, which can automate the tunnel for you in its ~/.fetchmailrc file:
[joe@workstation.acme]: vi .fetchmailrc

#  Sample .fetcmailrc file
#
defaults
   user joey with pass "NoWayJoe" is joe here
   no rewrite
poll localhost with protocol pop3 and port 1234 timeout 100: \
preconnect "ssh -C -f joey@server.com -L 1234:server.com:110 sleep 40"
Notice the backslash character which indicates line continuation.
Exercises
Here are some exercises to bring these concepts home.
Install a POP3 server on server.acme, and configure it for the Postfix mailer.
Install fetchmail if not installed already.
Create an SSH tunnel by hand and pop your test mail.
- Create a ~/.fetchmailrc file as above and
- test by running:
fetchmail
Create a cron utility that tunnels fetchmail every 12 minutes.